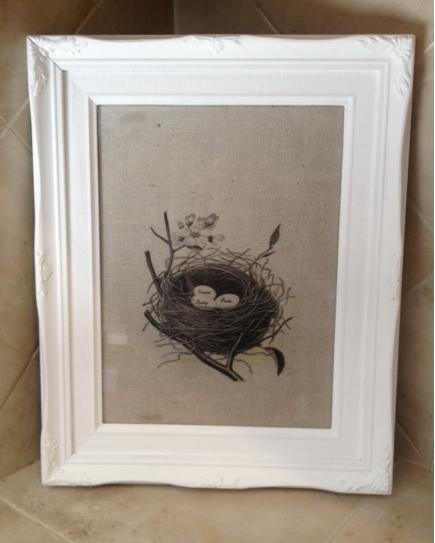
I am so excited about this project. When I put stuff on my walls I want them to mean something to me. What could be more special to me than my 3 little eggs! I used my printing of fabric technique to make this. I framed it using a thrift store frame I spruced up with white paint. If you would like to have your own copy of this with your kids or grand kids names I made a auction for it. I am only charging $5 to customize it for you with your names. Here is the Auction
Friday, February 1, 2013
Shabby Nest Print on Drop cloth
I am so excited about this project. When I put stuff on my walls I want them to mean something to me. What could be more special to me than my 3 little eggs! I used my printing of fabric technique to make this. I framed it using a thrift store frame I spruced up with white paint. If you would like to have your own copy of this with your kids or grand kids names I made a auction for it. I am only charging $5 to customize it for you with your names. Here is the Auction
Thursday, January 31, 2013
Printing on Fabric using glue stick & printer paper
I pulled off the 2000
I knew I wanted to print a E for our last name initial for the bucket. I hated to waste a sheet size of heatbond and even a sheet size of fabric just for such a small thing. This is what I did. First I cut a piece of my drop cloth material. I did not measure and I did not even cut a full printer size sheet. Just random like me ;-)
Then I took a regular piece of printer paper. I even used one I had wrote on to recycle it. The I took a regular glue stick and I put glue just around the border of the fabric and glued it to my paper.
| Fabric face down in printer tray Then I just hit print and DA DA! Magic |
So as you can see you can literally use stuff you have around the house to print onto fabric. You do not need any fancy tools just a piece of printer paper, a printer, fabric scrap and a glue stick!
Tuesday, January 29, 2013
New Wine cork cross Creation
We have been getting so much feedback and interested we have decided to make up a few and see how they will go over on the market. This one came out sound cute. It is definitely my shabby chic style so if we don't sell it I will keep it for myself! Check it out and tell us what you think. We are still working on a tutorial but the process is kinda long for this craft that we have decide it might be better to do a video tutorial.
Here is the link to the listing:
Sunday, January 20, 2013
Wine Cork Cross
Today I want to feature a craft done by my mother. I don't have step by step directions from her yet but I will add those later. I know she uses wine corks, wire and beads and then embellishments I think they are really unique. What do you think?
Saturday, January 5, 2013
threebsinsanity: Grandma (Honey) Washer Stamped Necklace
threebsinsanity: Grandma (Honey) Washer Stamped Necklace: Still working on getting this blog thing figured out. There is so much to learn. Today I want to showcase one of my new crafting passion...
Grandma (Honey) Washer Stamped Necklace
Still working on getting this blog thing figured out. There is so much to learn. Today I want to showcase one of my new crafting passions Stamping Washers! This is so fun. I read about stamping washers on Pinterest but I was a little skeptical. I mean it seemed too easy. I went to Harbor Freight and bought my little stamp set. I used a 20% off coupon so it ended up being $7 and a few cents. Then I was off to buy my washers. I went to Lowes. So this is what I discovered there are many different sizes and some have different size holes. They sell them individually or they sell them in packages that have 6 or 8 for $1.18 or so and they sell boxes of 100 of them. I went with the bag for $1.18. So this is some things I learned in this process that are keys to your success:
1. This is the most IMPORTANT tip also this was the hardest for me stamping is not something you can get perfect. There is no way or at least I could not see how that you could apply the exact same amount of pressure to every letter stamping and it is almost impossible to get the letters exactly lined up and spaced evenly etc. I like things perfect so it this was very hard for me. I went through a lot of washers because I would feel like one letter was more heavily stamped than the other or one letter was slightly to high compared to the next etc. I finally just stop worry so much with this and realized each piece was a one of kind piece of art and there would never be another one exactly like it and I just let it be.
2. You must stamp on concrete. Supposedly there are blocks made for this but I did not buy one. What I did try is stamping on top of a brick. This scratched the back of my washer badly. Then I tried various other things but what worked very best is placing the washer directly on hard but smooth concrete. I used the floor in my garage.
That is basically it. I used a regular hammer my $7 stamp set and regular zinc washer. This necklace featured is one I did for my mom. She has 3 children and 6 grandsons. I stamped the first washer with the name they call her which is "Honey" then next washer I stamped with my first and middle initial and then each one of my 3 sons first and middle initial Then I stamped on the next washer my sisters initial and her son. The last washer I stamped with my brothers initial and then his two sons initials The heart on the necklace is a something another family member made her and she included. on the necklace. She told me this was her favorite Xmas present of the year. Not bad for a cost of maybe $2 worth of supplies.
What do you think?
P.S. I just made this December 2012 my mom took the pictures and I don't think she knows how to change the date on her camera! HA!
Friday, January 4, 2013
First home Shabby Art
This is a Christmas present project I did for a friend. They bought their first home. I bought the frame at Michael's. It was black and already had the 3 mat insert. I painted it with two coats of acrylic white craft paint. Then I scuffed it up with sand paper to let some of the black show through. I cut drop cloth material into printer page size. I also cut Heat bond into printer page size. I ironed the heat bond to the drop cloth then I printed the address, house picture and #1 onto the pages. Yes you can run regular fabric through your printer! There are tons of different methods but I like the heatbond paper method best. Be sure to put the fabric face down into your printer paper tray. I then cut my freshly fabric printed pictures to fit the matting openings. I taped them with
Here is a link to what the heatbond is: http://www.walmart.com/ip/Heat-n-Bond-Lite-Sewable-Iron-On-Adhesive-Value-Pack-17-x-5.25-yds/17338066
Here is a link to the drop cloth I used : http://www.walmart.com/ip/Trimaco-Heavy-Weight-Canvas-Drop-Cloth-6-x-9/17300519
Here is a link to the frame I used: http://www.michaels.com/3-opening-black-collage-frame/fr0759,default,pd.html?start=8&cgid=products-framing-collage
Update!!!!! I am new to blogging and I completely forgot to give credit where credit is due. I got my orginal idea for this from our fifth house: Piano Keys And Telling Our Story: She did not print on fabric like mine but her post is what got my wheels turning!
Subscribe to:
Posts (Atom)